Polski
 English
 Italiano
 Español
 Čeština
 Српски
 Deutsch
 Ελληνικά
 Slovenský

Addin ONT to OLT terminal
Hotswap
All discs can be inserted and removed while the device is operating. The minimum that is needed for the operation of the OLT terminal is:
- chasis
- symmetrical splitter PLC 1x16 ABS box
- 1 fan board
- 1 control board
- 1 power board
Board status:
| Component type | Status | Menanig |
|---|---|---|
| Control board | Active_normal | A working, active board |
| Standby_normal | Backup, will switch when the first fails | |
| Standby_failed | The disc is corrupted / sometimes the disc may assume this status for a while during synchronization | |
| All | Config | The board is begin sync |
| Everything except the control board | Normal | Everything is fine |
| Failed | The board is damaged or the software driver for it is missing | |
| Autofind | The board has been detected and is pending approval |
more about statuses can be found in our previous guide:: click here
Configuration
Connect to the device:
- We connect via telnet or SSH with the IP address 10.11.104.2
- Default login data: root/admin or from version V016 root/admin123
- After logging in, enter 2 commands that will make it easier for us to use OLT:
- undo smart -this command disables the need for additional confirmations when entering commands.
- idle-timeout 30 - (1-255) session timeout in minutes
- Command enable - raises our privileges in the system (let's call it privileged mode)
- Command config - takes us to configuration mode
- Command display board 0 - will display a list of boards installed in the device and their current status. To display more detailed information about a specific board, enter display board 0/board number. ATTENTION! The disc must be previously accepted in the device.
- Command board confirm 0 - accepts all detected (not yet added) discs.
- Command save configuration - saves the current OLT configuration.
- Command display version - wyświetla wersje oprogramowania na płycie lub płytach kontrolnych.
VLAN Configuration
We will need the VLAN to send the transmission. Using an untagged broadcast is unwise and may cause us a lot of trouble in the future. So let's create a VLAN according to the following instruction:
- vlan 20 smart - creating a smart VLAN interface with id 20
- vlan desc 20 description “Internet” - description in the system
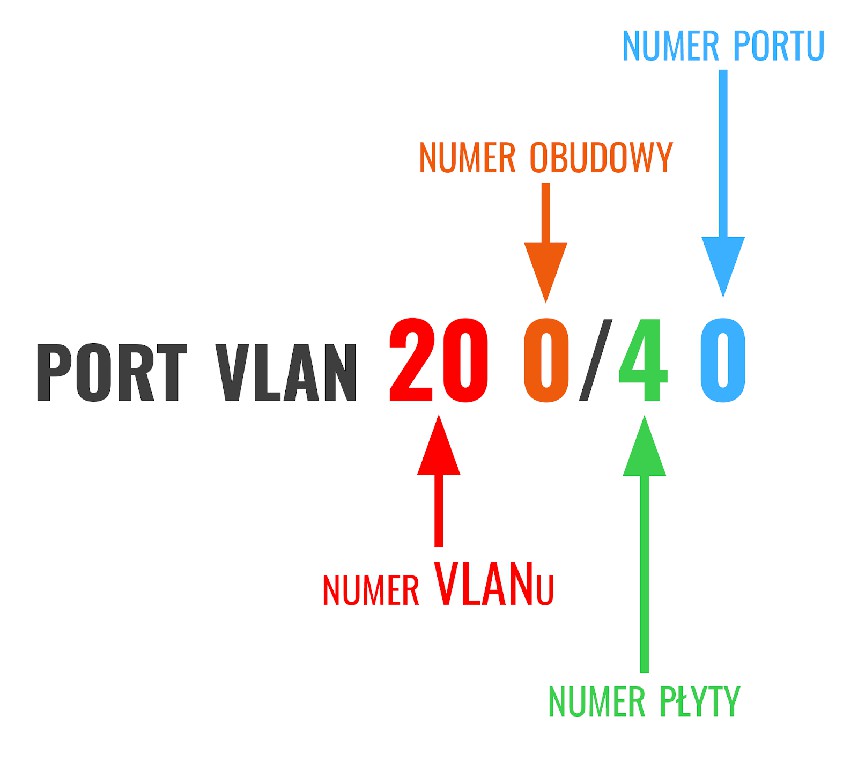
- port vlan 20 0/4 0 - assigning a VLAN to the uplink port
- interface vlanif 20 - go to the VLAN configuration mode
- ip address 192.168.70.2 24 - setting the IP address with a mask of 24 (255.255.255.0). Now at this address we gain the ability to configure the device via this VLAN
- quit - exit the VLAN configuration and return to the config mode.
- save - save the configuration.
- Volunteers can now log out and log in to continue configuration via VLAN
- To log out, type quit twice. If we do not do this, the session will expire automatically after the time specified in the idle-timeout command at the beginning, right after logging in. ATTENTION! The root user can only have one active session by default.
We connect the Uplink port
DBA Profile
As a curiosity, we invite you to check, define and explain how exactly DBA profiles and TCONT containers work: DBA profiles
DBA (Dynamic Bandwidth Allocation) - it is a mechanism for dynamically changing throughput over time.
What are the benefits of using a DBA profile?
Improves PON link usage efficiency by dynamically adjusting bandwidth between ONU and OLT in response to ONU demand. Network operators can add more end subscribers in the PON network due to more efficient use.Thanks to this, we can provide services to customers at the guaranteed level (SLA) of the Service Level Agreement and limit the maximum speed in the network (bandwidth occupancy).
DBA profile types:
| Typ | Transmission type | Use to |
|---|---|---|
| 1 | Constant throughput | This is a reserved band. This type can be used for voice service. |
| 2 | Guaranteed minimum bandwidth | This is guaranteed bandwidth. It is similar to type 1. We can use this type for VoIP, Video and Management. |
| 3 | Guaranteed minimum throughput, maximum throughput | Type 2 with an upper bandwidth limit |
| 4 | Maximum throughput | Internet delivery |
| 5 | All of the above taken together |
| Transmission type | Type 1 | Type 2 | Type 3 | Type 4 | Type 5 |
|---|---|---|---|---|---|
| Constant throughput | ✅ | ✅ | |||
| Guaranteed minimum bandwidth | ✅ | ✅ | ✅ | ||
| Maximum throughput | ✅ | ✅ | ✅ |
Thread about DBA profiles on huawei.com forum
dba-profile add profile-id 10 profile-name „DBA-1Gb” type3 assure 8192 max 1024000 -we create a DBA profile with id 10, its name is DBA_1Gb type 3, the minimum guaranteed speed is 8 Mbit and the maximum is 1 Gbit
Curiosity
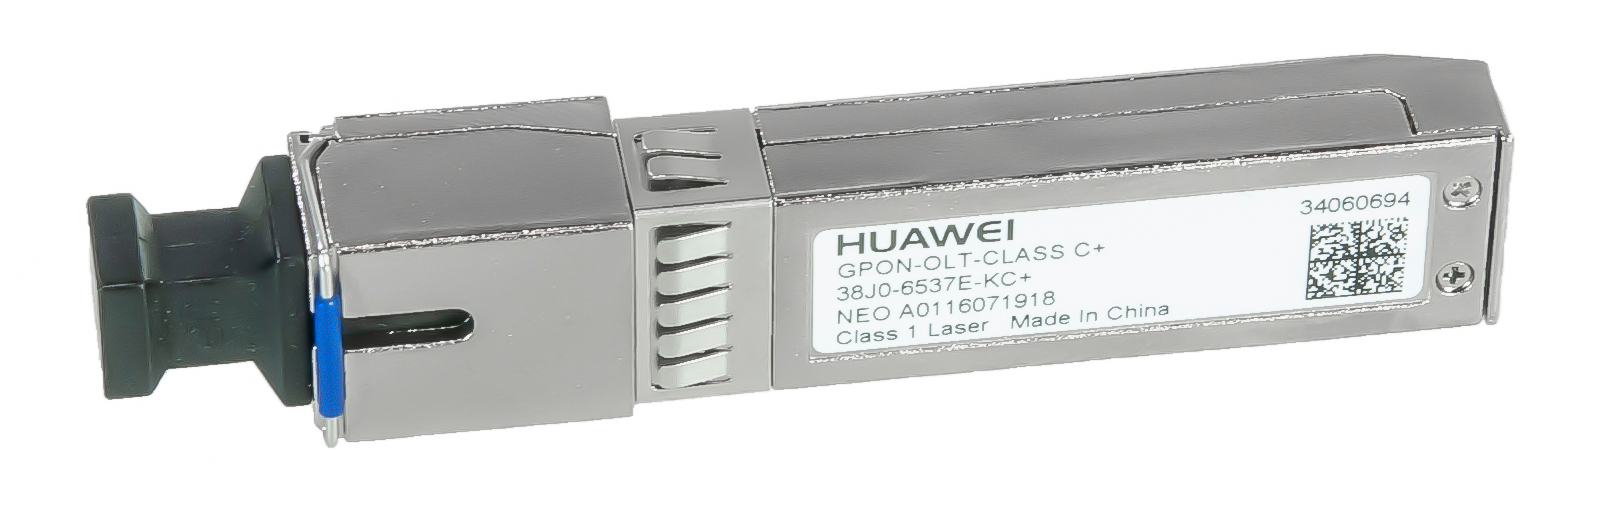
Some of you may wonder why 8 Mbit. According to GPON technology, the maximum split is 1:128, which gives us 128 clients per port. The insert below has a bandwidth of 2.5/1.25 Gbit We limit ourselves to the lower speed. 1250 Mb /128 clients = approximately 8 Mbit. We decided to leave a small reserve so that the link capacity would not overflow and there would always be a reserve for services such as VoIP and IPTV. If all clients started downloading at the same time, each of them would be guaranteed a minimum of 8 Mbit of connection.
Creating profiles for ONT being a router
ont-srvprofile gpon profile-id 1 profile-name “8240H” - we create a service profile containing information about its physical properties (ETH, TEL, CATV ports, etc.), after executing the command, we will be transferred to its configuration.
ont-port eth 4 pots 1 - we add information about ports in the device to the profile, our model 8240H has 4 Ethernet ports and 1 telephone port
commit - approval of profile changes
quit - exit from profile editing
Creating profiles for ONT which is a bridge
ont-srvprofile gpon profile-id 1 profile-name “8240H” - we create a service profile containing information about its physical properties (ETH, TEL, CATV ports, etc.), after executing the command, we will be transferred to its configuration.
ont-port eth 4 pots 1 - we add information about ports in the device to the profile, our model has 4 Ethernet ports and 1 telephone port
port vlan eth 2-3 translation 20 user-vlan 30 - this allows us to release tagged VLAN to ONT ethernet port with id change
port vlan eth 2 transparent - this allows us to release a tagged VLAN to the ONT ethernet port without changing the id
commit - approval of profile changes
quit - exit from profile editing
Create GEM profiles and T-CONT traffic containers
Transmission container (T-CONT) - is an ONU object consisting of a group of logical connections. It is designed to prioritize traffic and manage PON network bandwidth. ONU/ONT has a fixed number of supported T-CONTs. During device activation, the OLT detects the number of T-CONT instances supported by a given ONU and implements their use.
We have 5 types of T-CONT
Type 1: has a fixed bandwidth and is mainly used for delay-sensitive and high-priority services such as VOIP
Type 2 i Type 3: they have guaranteed bandwidth types and are mainly used for video and higher priority data services.
Type 4: it is best-effort and is mainly used for data services such as the Internet and low-priority services that do not require a lot of bandwidth.
Type 5: This T-CONT is a mixed type, it covers all types of capacity and service types.
ont-lineprofile gpon profile-id 1 profile-name “8240H” - creating a service profile
tcont 1 dba-profile-id 10 - przypisanie profilu DBA do kontenera T-CONT (Traffic Container)
gem add 1 eth tcont 1 - creating a GEM (GPON Encapsulation Method) for transferring a single service and assigning it to a traffic container (T-CONT)
gem mapping 1 1 vlan 20 - map GEM 1 to T-CONT number 1 and assign it VLAN 20. commit - commit changes to the profile
quit - exit from profile editing
Adding an ONU/ONT device to the OLT
interface gpon 0/2 - entering GPON board management mode
port 0 ont-auto-find enable -starting automatic detection of new (not added) devices on port number 0
display ont autofind 0 - display of detected devices
ont add 0 0 sn-auth xxxxxxxxxxxxx omci ont-lineprofile-id 1 ontsrv-profile-id 1 - adding a device using previously created profiles
display ont info 0 0 - display information about device number 0 in port 0
display ont info 0 all - displaying information about all devices connected to port 0
ont port native-vlan 0 0 eth 1 vlan 20 priority 0 - to the port of the first device 0 on the GPON port 0 we assign vlan 20 with the lowest priority, as a result of which the transmission will be unblocked. This is not necessary, it untags the vlan on the port (PVID)
quit - we exit GPON board configuration mode
Assigning service port
service-port vlan 20 gpon 0/0/0 ont 0 gemport 1 multi-service user-vlan 20 tag-transform transparent - as in the above command speaks for itself. Create a port (if we want to manually add a port, we can enter it after the service-port) to which vlan 20 is assigned to ont 0 on the board 0 port 0 housing 0, use gemport 1 for this, various services will be sent and the VLAN itself is to be transparently transferred
Configuration of the ONU/ONT terminal after connecting to the OLT
We log in to the ONT by entering the appropriate IP address depending on the device we have. We will operate on the Huawei EG8145X6 terminal. We want all LAN ports to work behind NAT, so we select all LAN ports in the “advanced/ Layer ⅔ Port” tab. As in the attached picture:
Now go to the WAN tab and select the settings that interest us:
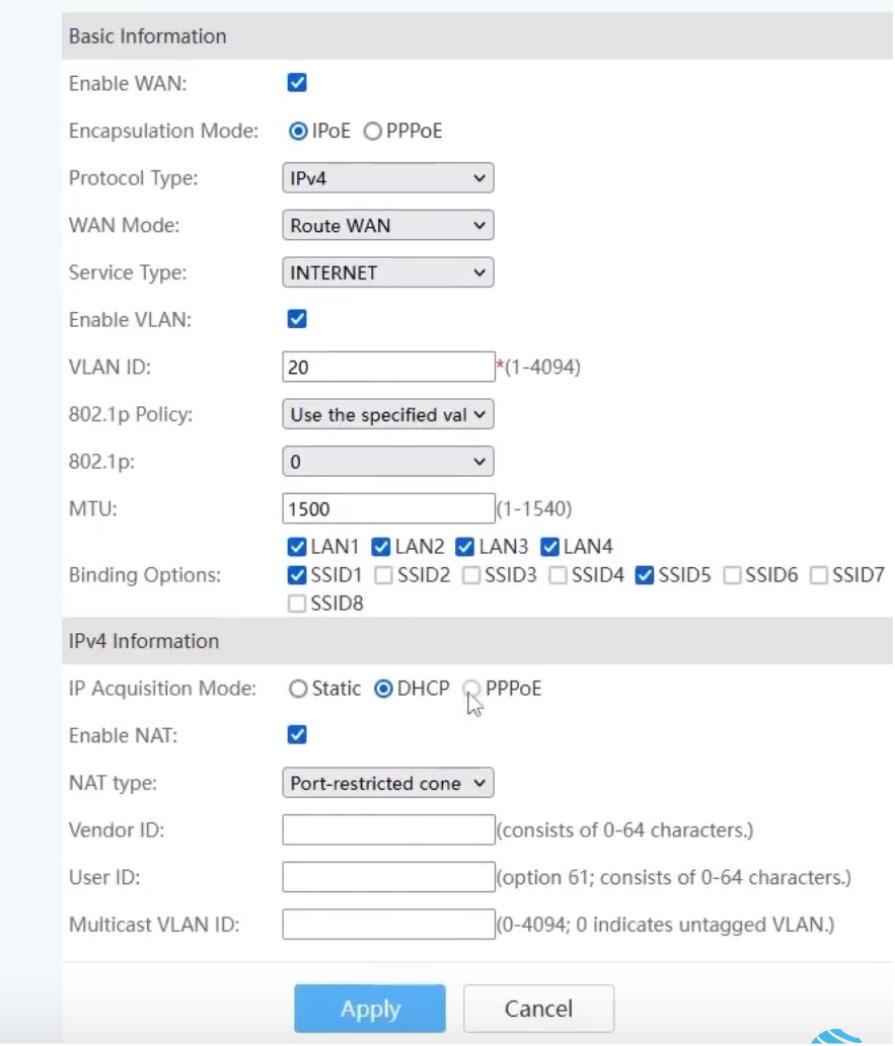
WAN Mode - here we have two options, which are router mode and bridge mode respectively.
Service Type - in this case, we choose the option that is appropriately suited to our services, we chose the Internet itself, due to the fact that only this service is provided to the client.
VLAN ID - enter the VLAN ID that we set earlier, in our case it is 20.
802.1p - this is VLAN priority setting, default value is 0
Binding Options - here we select the ports that we want to use the given WAN, for us it will be all ports and all frequencies of the Wi-Fi network.
Initial tests
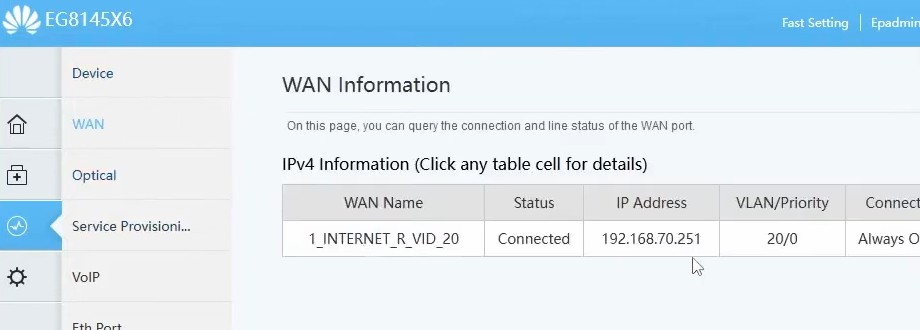
Teraz jeżeli wszystko poprawnie skonfigurowaliśmy ONT powinien otrzymać adres IP na interfejsie WAN. Jeżeli widzimy adres możemy teraz przetestować czy mamy Internet na wybranych przez nas interfejsach Wi-Fi/ETH
Konfiguracja zdalnego dostępu do terminala ONU/ONT
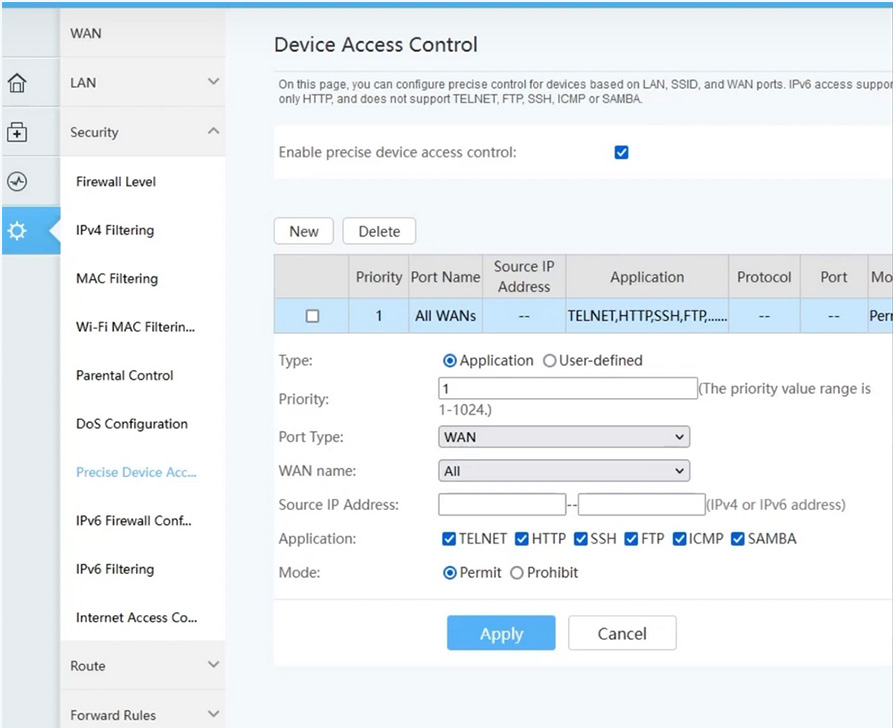
- To do this, we need to go to the Firewall level tab, and then to the Precise Device Access sub-tab.
- We create a new rule.
- Port type - we choose the type of access we want to get. Here we have three options:
- LAN - setting access from the LAN side;;
- SSID - setting access from the Wi-F network;
- WAN - setting access from the global side.
- IP Address - here we can select the pool of IP addresses to which we want to restrict access, if we leave this field empty, all IP addresses will have access.
- Application - choose the services you want to access..
- Mode - in this option, we decide whether we want to add a rule as prohibiting the above actions or allowing them.